PaoloJulian.dev - Article
go to article list
How to Send Emails in Next.js 13 Using the New App API Route

Photo by Stephen Phillips - Hostreviews.co.uk on Unsplash
TL/DR - Learn to send emails from your Next.js 13 app using the new app directory with nodemailer.
Note: This article assumes you already installed the new Next.js 13 app
Table of Contents
- Step 1: Setup Gmail App Password
- Step 2: Add the nodemailer Library
- Step 3: Creating a Send Mail Function
- Step 4: Test
Step 1: Setup Gmail App Password
-
Enable 2-step verification
- To enable this feature, you should enable the 2-step verification first. https://support.google.com/accounts/answer/185839?hl=en&sjid=6632639683164807671-AP
-
Add an app password
- Please open your browser and navigate to the following Google link: https://myaccount.google.com/apppasswords.
- Once there, generate a new APP PASSWORD.
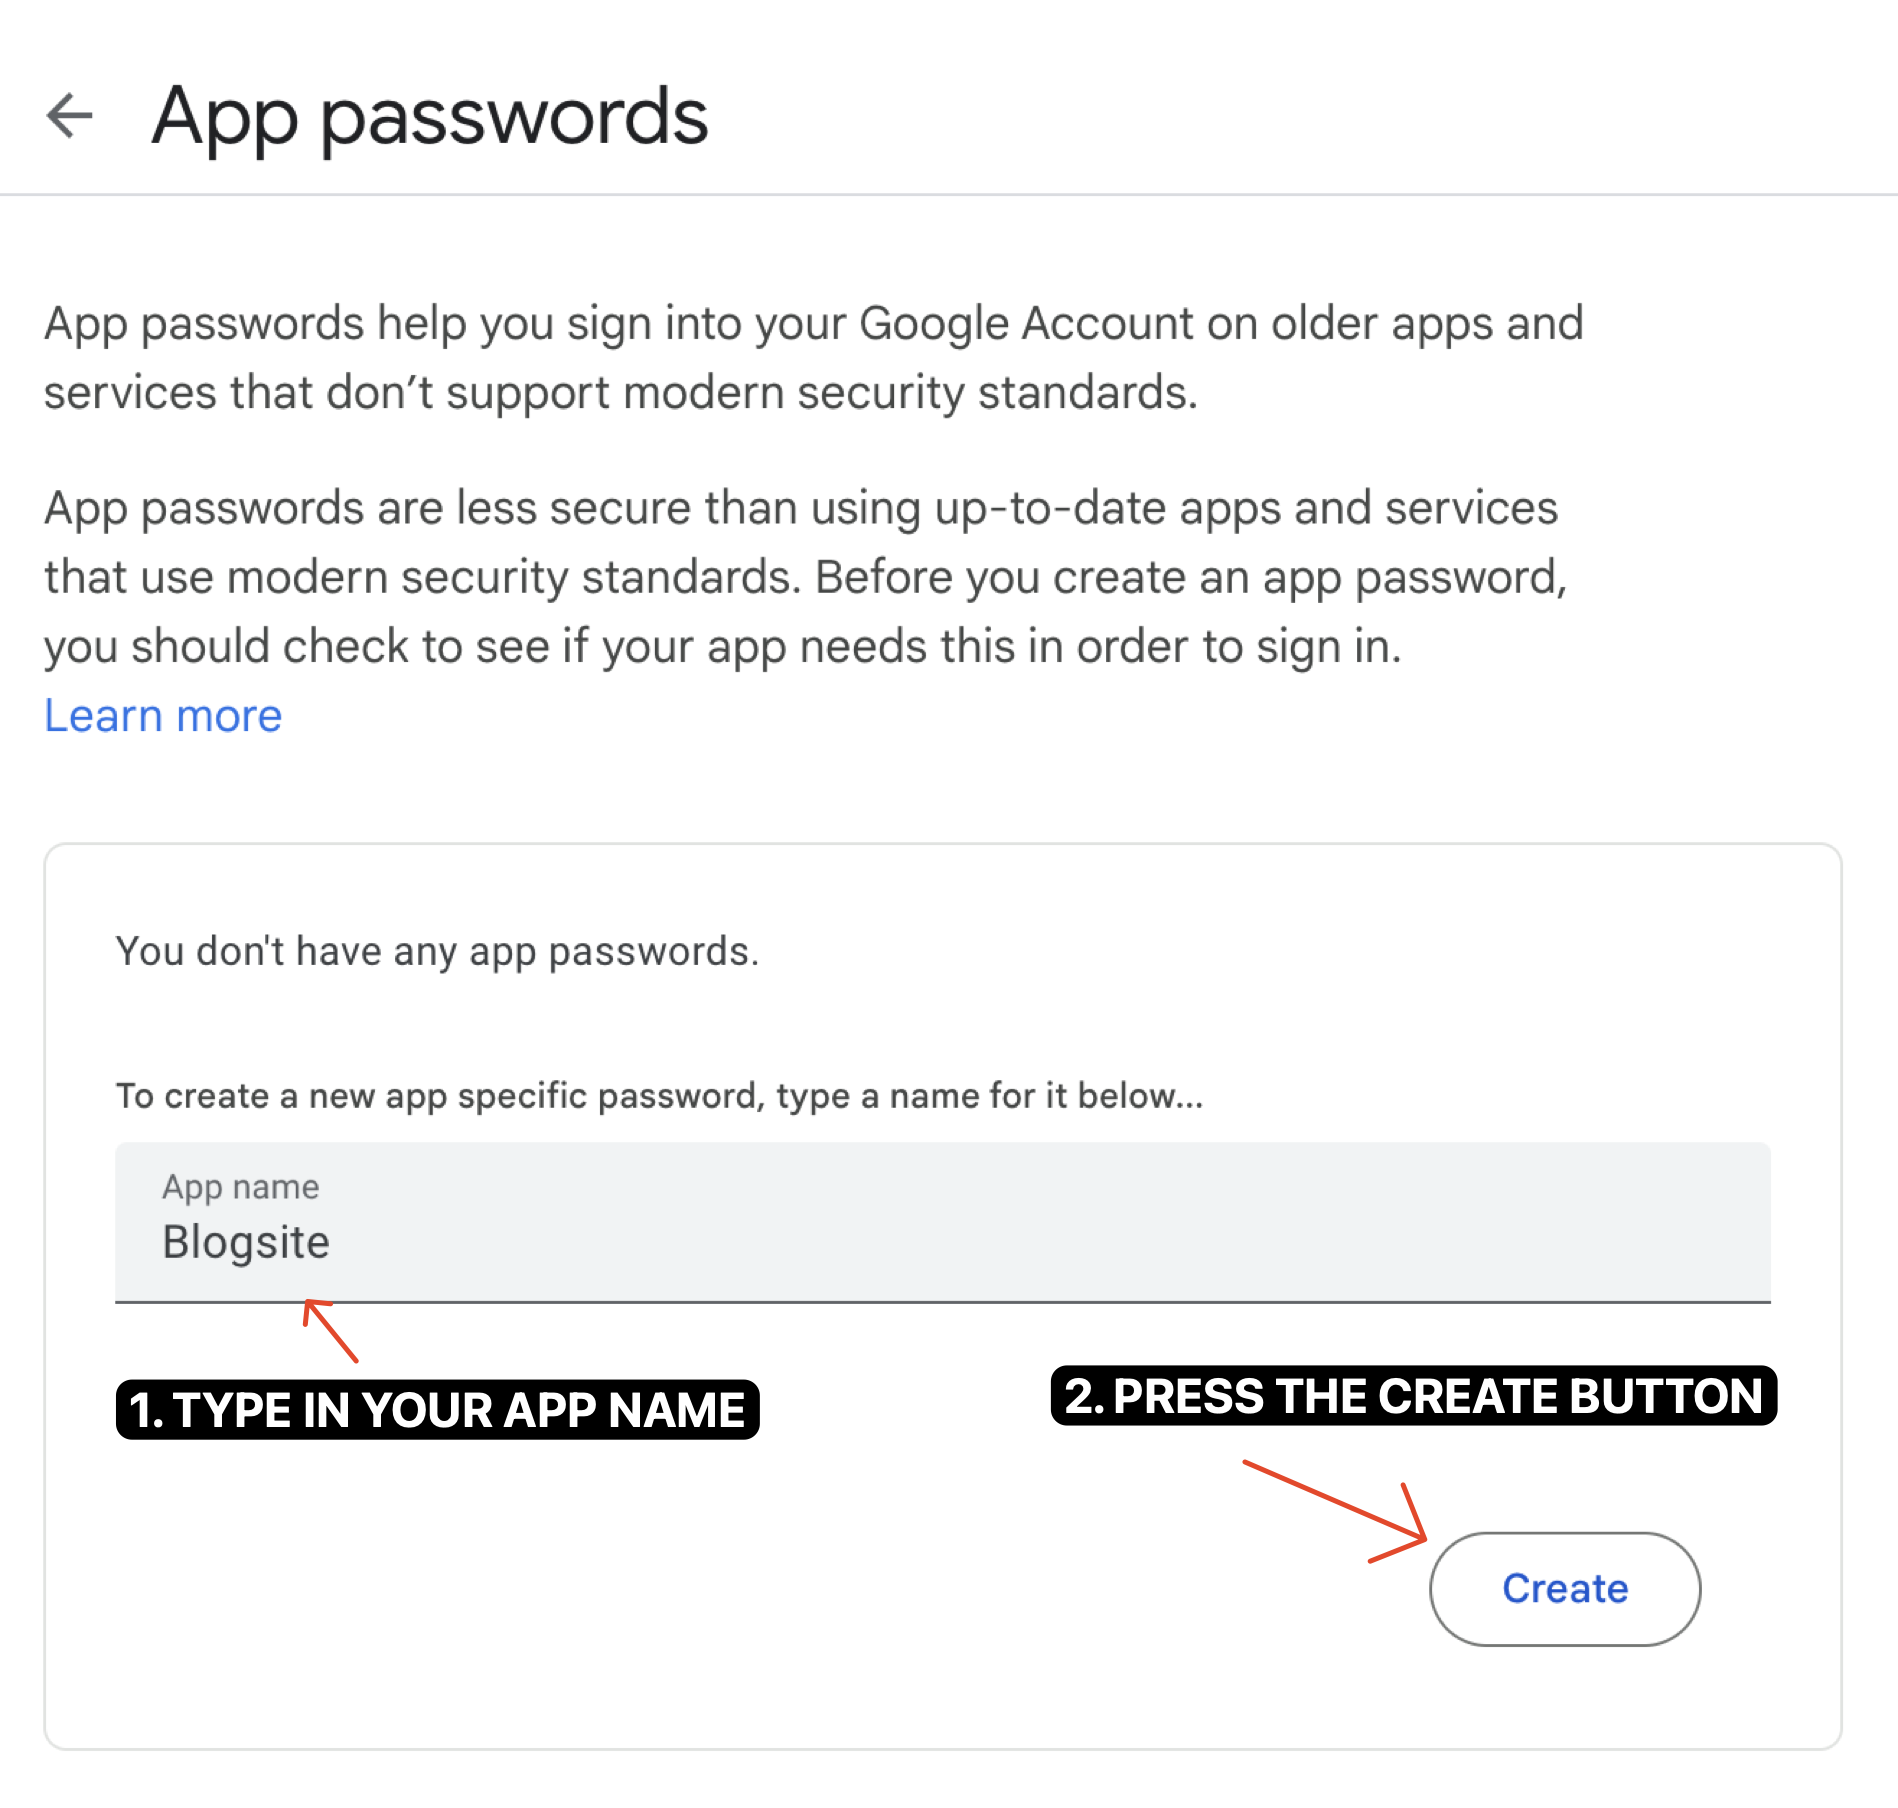 Google App Passwords
 - A popup will appear with your new app password, this will be used in accessing your gmail for the nodemailer library.
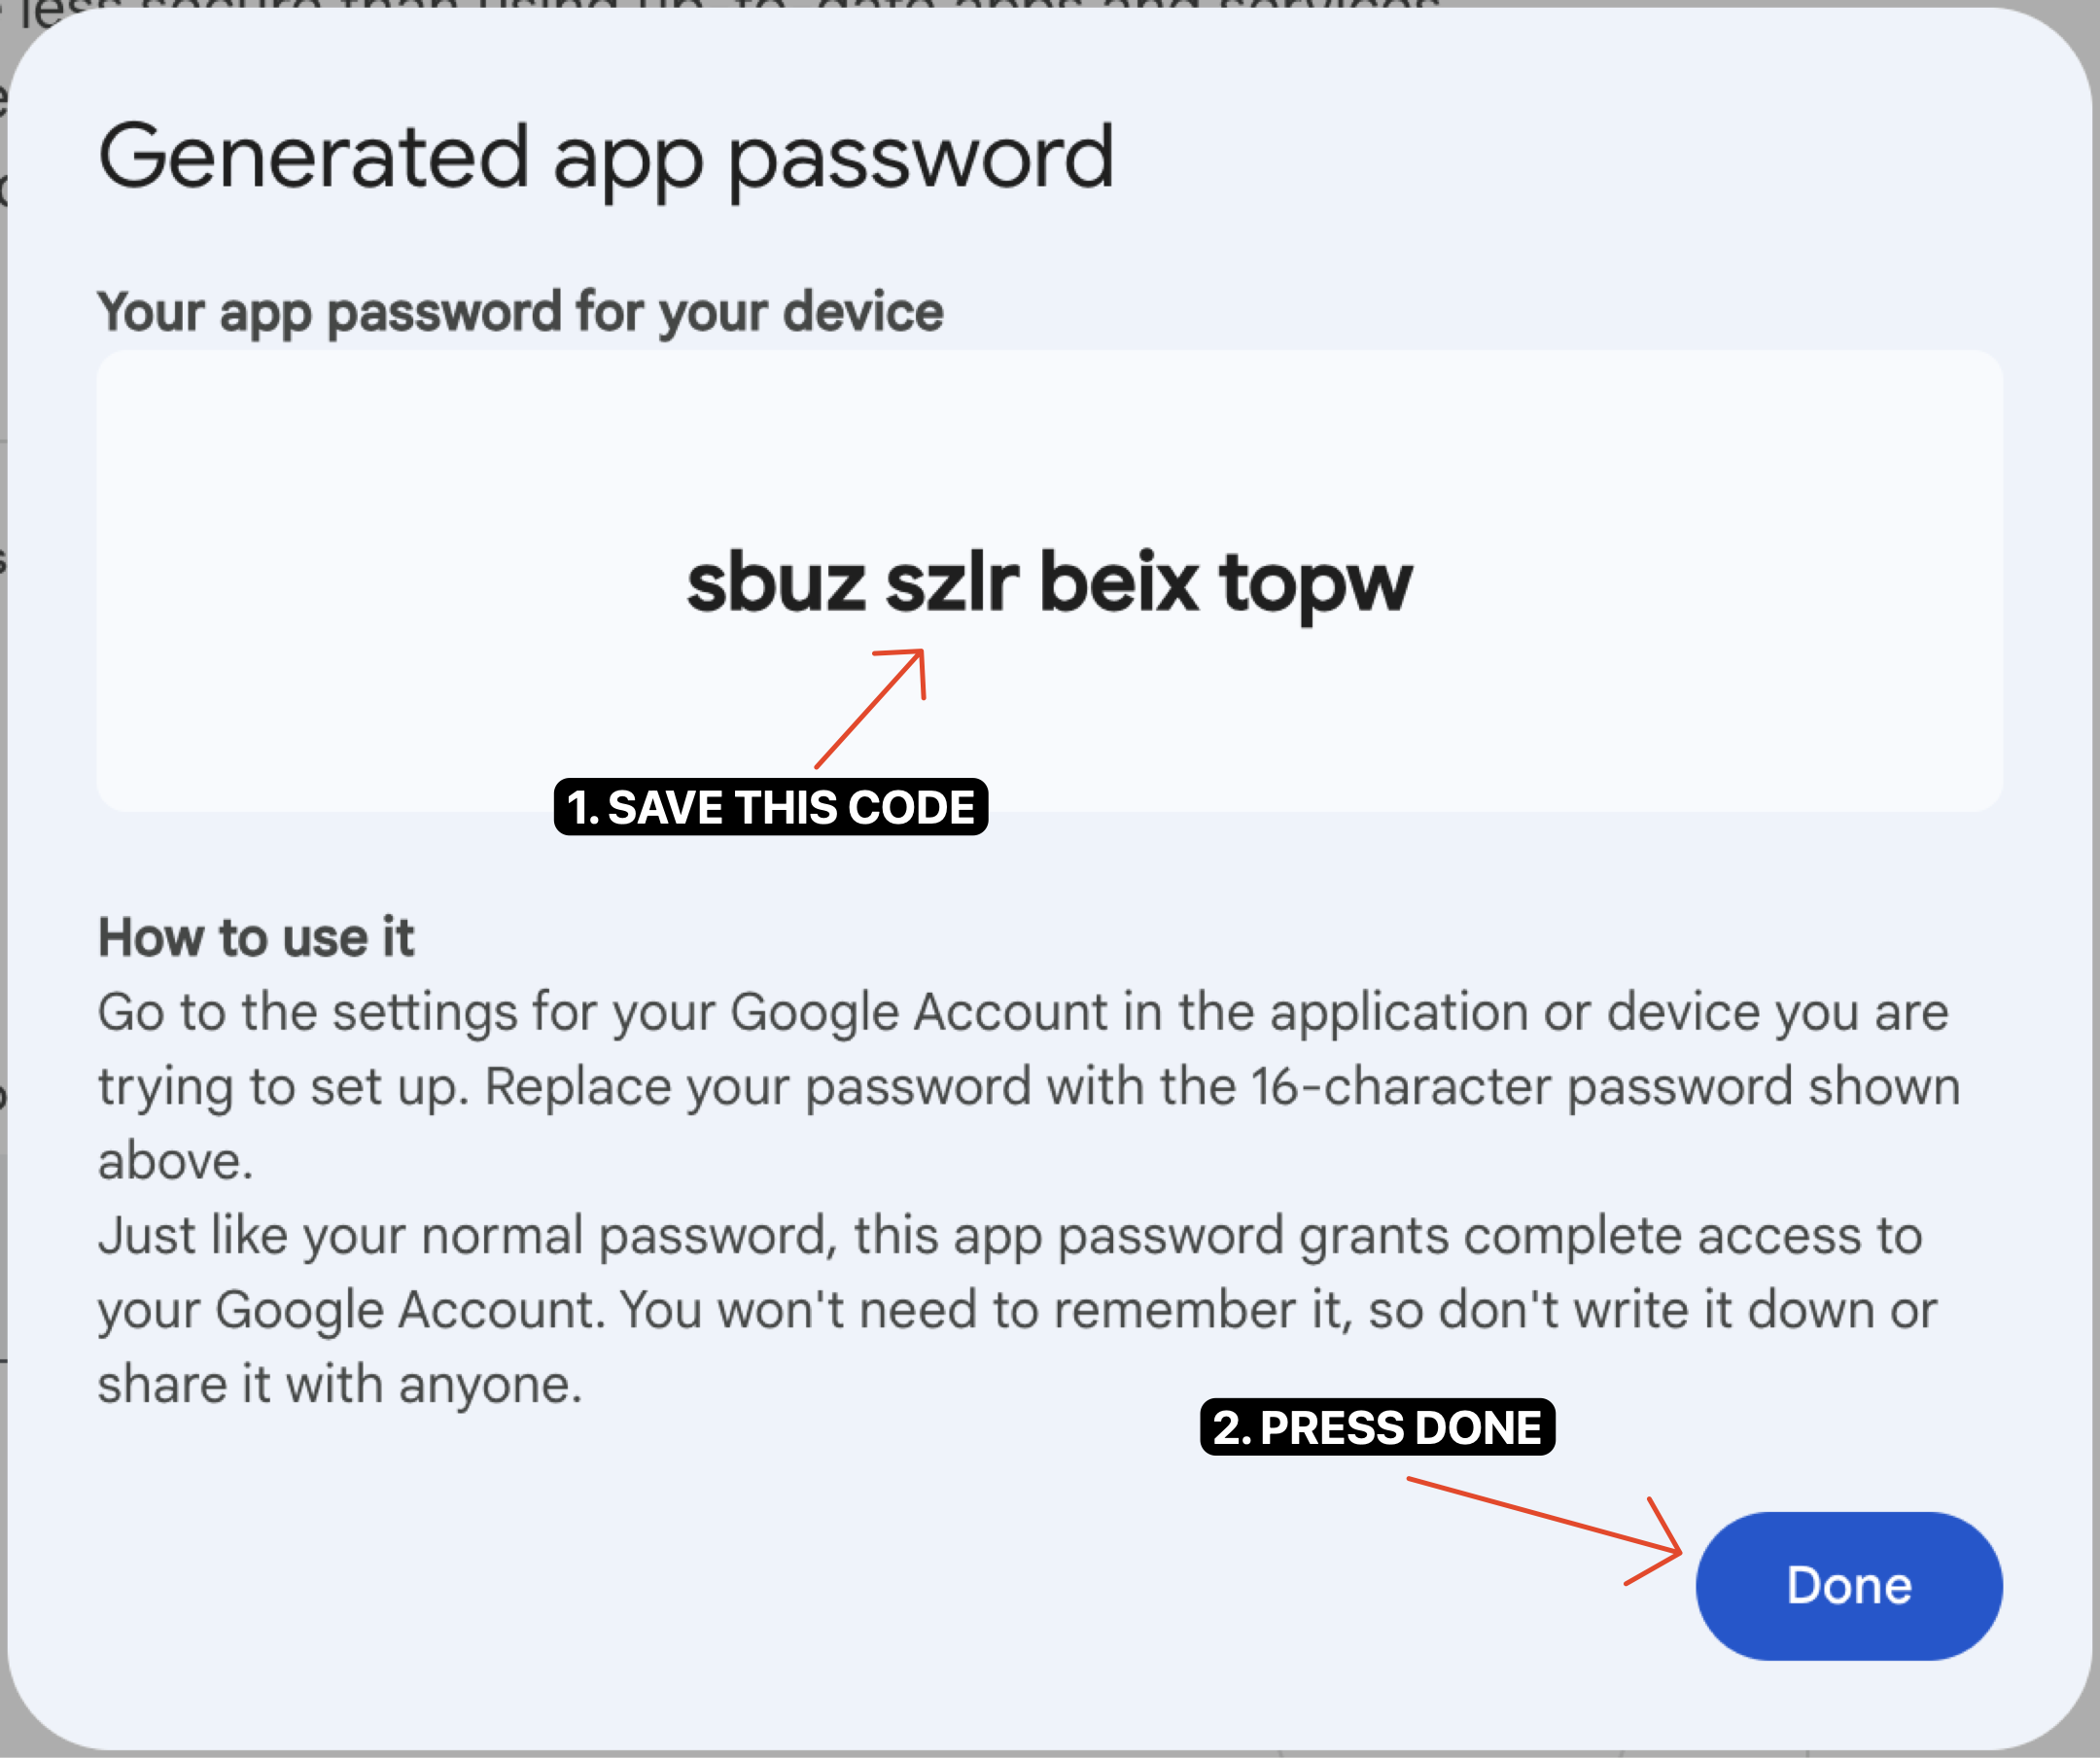 Generate app password
-
ENV File
- Add the newly generated app password into you
.env.localfile
- Add the newly generated app password into you


# .env.local
GMAIL_APP_USERNAME=johndoe@email.com # The email address where you generated a new app password
GMAIL_APP_PASSWORD=qwerqwerqwerqwer # The newly generated app password
Step 2: Add the nodemailer Library
Install the dependency
# javascript
npm i nodemailer
# typescript
npm i nodemailer && npm i --save-dev @types/nodemailer
Create a nodemailer library
// ./src/lib/nodemailer.js
import nodemailer from 'nodemailer';

const ENVIRONMENTS = {
  GMAIL_APP_USERNAME: process.env.GMAIL_APP_USERNAME || '',
  GMAIL_APP_PASSWORD: process.env.GMAIL_APP_PASSWORD || '',
};

const transporter = nodemailer.createTransport({
  service: 'Gmail',
  auth: {
    user: ENVIRONMENTS.GMAIL_APP_USERNAME,
    pass: ENVIRONMENTS.GMAIL_APP_PASSWORD,
  },
});

export default transporter;
Step 3: Creating a Send Mail Function
Create a service function
// ./src/services/sendMail.js
import transporter from '@/lib/nodemailer';

export default async function sendEmail({ subject, text, to }) {
  const mailOptions = {
    from: process.env.GMAIL_APP_USERNAME,
    to, // The person you want your email to be sent
    subject,
    text,
    // You can also add in HTML if you dont want plain text
  };

  return new Promise((resolve, reject) => {
    transporter.sendMail(mailOptions, (err, info) => {
      if (error) {
        console.error(error)
        return reject('Unable to send email')
      }

      const message = `Message delivered to ${info.accepted}`;
      console.error(message)
      return resolve(message);
    })
  });
}
Create the app route
// ./src/app/api/send-email/route.js

import sendMail from "@/services/sendMail";

/**
 * @param {import('next/server').NextRequest} request
 * @returns Describe your return type here
 */
export async function POST(request) {
  const { to, subject, text } = await request.json();

  const response = await sendMail({
    subject,
    text,
    to
  });

  if (!response.ok) {
    return new Response('Something went wrong!', { status: 503 })
  }

  return Response.json({ message: 'Email sent!' });
}
Step 4: Test
Let's see if what we did actually works!


That's it! You're ready to go.
TAGS:
#next.js
#next.js 13
#nodemailer
#next app directory
go to article list
Latest Articles

Having trouble updating branches that is dependent to one another? Enter git-branch-updater

KEEP IT SIMPLE STUPID! EP1 - Pomodoro

The Right Way to Make Component Variants using Tailwind

Essential Tools and Libraries for Daily Web Development Works
How to Send Emails in Next.js 13 Using the New App API Route

Mastering React Testing: A Comprehensive Checklist of What to Test

Mastering Commit Messages: Best Practices and Examples

How to Integrate Contentful to Next 13

Real-Life Applications of Design Patterns in Your Daily React Code